Thursday, December 26, 2013

Merry Christmas & Happy New Year!

I am a little late on the Merry Christmas wishes but I hope it was a wonderful time for each of you filled with warm and wonderful moments! May 2014 bring much happiness to all! I will be back soon with more inspiration!
Creatively Yours,
Sharon

Friday, December 20, 2013

Stamped Tea Bag Medallion Card!


Project design ©Sharon M. Reinhart 2013
Hi all! I am participating in a blog hop today and thought I would share this card made with designer and friend Ann Butler's 1-inch Faux Quilting stamps from Unity. The quality of these stamps are great, producing wonderful stamped images! These stamps can be used in a variety of projects and surfaces. Quilting effects on fabric, paper, air dry clay - they all work wonderfully. I have chosen to create a tea-bag folded medallion to adorn a Christmas ornament. The stamps that I used are from two different sets - the 1" Diamond and Plaid and the 1" Doily Picnic sets. The ink used is the Colorbox Fluid Chalk Ink from Clearsnap in Warm Red. I also encourage you to visit EZ-De's stamps designed by Ann as well as her ink line from Clearsnap. The ornament shape is the 2011 Heirloom Ornaments die set from  Spellbinder's TM and the embossing folder is the Snow Burst folder from Stampin' Up. This card is going to be the inspiration for some Christmas gift tags that are on the To Do list! Hope you like it!
Creatively Yours,
Sharon

Monday, December 9, 2013

Christmas Card Inspiration!

As seen in CardMaker Magazine's online newsletter
Project design and article by Sharon M. Reinhart
 
If you are looking for some Christmas Card inspiration, I would like to invite you to head on over to CardMaker Magazine's online newsletter to read my most recent edition. This issue is about creating quick and festive greetings. While you are there sign up for this free resource and then every three weeks a new issue will be delivered directly to your inbox. The editors of this newsletter are yours truly and Kimber McGray, we alternate the writing of these informative and inspirational articles. Hope you like it and don't forget to provide reader feedback and let us know what topics you would like to see covered in future newsletters.
Creatively Yours,
Sharon

Sunday, December 8, 2013

Snowflake Greeting Card

Card design ©Sharon M. Reinhart
As promised here is the other Merry & Bright card I promised you. This one has a snowflake on it created with the same Spellbinders die templates as my previous post. This sparkling snowflake is made with felt, cardstock and beautiful diamond Dust glitter from Flora Craft. The Merry & Bright greeting is from Papertrey Ink. Hope you like it!
Creatively Yours,
Sharon

Monday, November 25, 2013

Merry & Bright Christmas Card!

Project design ©Sharon M. Reinhart 2013
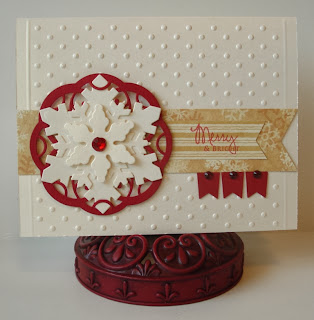
Wow! We are at one month before Christmas! I am sure many of you are busy creating your Christmas greeting cards and some are even finished and yet others are just beginning. No matter what stage you are at I hope this card will bring you inspiration for a card, tag, scrapbook page, or gift bag décor.
The point of this creation aside from Christmas is to encourage you to make use of those products that you have purchased in the past and don't be afraid to combine them with new ones. Most magazines must stay with current product in their designs, as do I for projects that are being published, but what happens to those products that we all love and still have. Where is the inspiration for our most loved tools? For this design and more to come in the future I have decided to make use of some products that manufacturer may have discontinued but that many of us still have and want to use. After all we all have those favorites!
This card makes use of leftover scraps of paper for the banner/flag pieces, an embossing folder for the embossed dots, a Papertrey Ink stamp (love their stamps, and no I do not work for them), EK Success mini banner punch and a new SpellbindersTM die and an older favorite of mine. The new one, and still available is the Medallion 1 ShapeabilitiesTM  Die D-LitesTM  combined with one of my favorite snowflake die-template sets, the ShapeabilitiesTM Create A Flake 1. It is almost like they were made for each other - but couldn't be as one is current and one is not. The way the largest snowflake can be slipped underneath portions of the medallion is perfect! Perfect if you would like to have a removable ornament on your card or just simply perfect as a design element.
This is a simple card, yet I believe it to be elegant and effective at relaying the merriest of wishes! Keep tuned for another card using similar supplies but with an even frostier look!
Creatively Yours,
Sharon

Saturday, November 16, 2013

Festive Greetings Class!


I am sure many of you are busy creating your Christmas greeting cards and tags and possibly looking for inspiration or a creative break. So, I wanted to share this info about a class that I am teaching at a crop on November 23rd from 1 - 3 pm in Calgary. In the photo above, at far left is a card that doubles as a gift, the ornament in the center is removable and may be used as a magnet or an ornament. Next center bottom is a gift card holder which incorporates Spirelli thread wrapping. Far right is a square greeting card which also incorporates Spirelli wrapping and center top is a festive tag. The fee is $20.00 for the class. You do not have to be registered for the crop to take the class. Participants please bring your basic paper crafting kit with scissors, double-sided tape such as Scor-Tape, runner tape, foam mounting tape/dimensionals, paper trimmer, and bone folder.
Please register for the Festive Greetings class in advance directly through Sharon by email sharonmreinhart@yahoo.ca no later than Nov. 21st, 2013. On site class registration will depend on availability. Register for the crop OR the classes OR both! This crop is hosted by Joanne Liddy-McTavish and is being held at the Woodcliff United Church 5010 Spruce Drive SW. Contact Joanne to register for the crop at jliddymct@shaw.ca. The fee for the crop only is $40.00 per person.  Hope to see you!
Creatively Yours,
Sharon


Thursday, November 14, 2013

Festive Tag!

Project Design ©Sharon M. Reinhart

Wow - I cannot believe how time has flown, we are already at mid November! I thought I would share a photo of this Festive Tag I recently taught at a crop. It is a mixed media creation making use of paper, paint, stamps, ink and even metal duct tape.
I know many of you are working on your Christmas greetings and may be looking for some inspiration. It's a wonderful way to spend some time with your friends so I encourage you to take a take a creative break!
Hope you like it and that it inspires you to create!
Creatively Yours,
Sharon

Monday, October 28, 2013

Halloween Greetings; Mini Festive Card Class!

©CardMaker Magazine; project design by Sharon M. Reinhart
If your are looking for some Halloween inspiration, head on over to my latest edition of the CardMaker online newsletter. While you are there be sure to sign up for this free resource! Once your signed up it will come directly to your inbox every three weeks. Kimber McGray is the other editor of this newsletter and we switch off writing the different issues. You can find out the editor by looking in the Last Word section. In this issue I am sharing ideas for treat holders and greetings using mostly non-specific Halloween products, the only truly Halloween item is a rubber stamp. Head on over to CardMaker to find out more!
Project design ©Sharon M. Reinhart 2013
Lot's of news today! I will be teaching a Mini Festive Card class on November 9th at a crop benefiting the Tails to Tell animal rescue. The fee for the class is $12.00 with a portion of the proceeds from the class being donated to this worthy cause. We will be creating a card and a gift card holder. Participants will need to bring some supplies and will receive a list upon registration. Please join me November 9th from 1:15 - 2:15 pm at Highwood Community Centre in Calgary (16 Harlow Avenue NW). To register for the card class please contact me through email at sharonmreinhart@yahoo.ca. The crop is from 10 am to 10 pm and the fee of $30.00 includes lunch, supper, snacks and door prizes. I will be donating and teaching a free make and take, Christmas tag, for the crop participants. For further information and registration for the crop please contact Sandra directly at pye.s@shaw.ca. Hope to see you!
Creatively Yours,
Sharon

Wednesday, October 23, 2013

Happy Birthday Card!

Project design ©Sharon M. Reinhart 2013
Just wanted to share this birthday card with you that I made for a friend recently. For those of you that enjoy tea bag folding, this design incorporates two tea bag folded rosettes that have been layered. Just use two different sizes of circles when folding. The wonderful layers underneath the rosette were created using one of my favorite Memory Box die templates. The leaf was created using an Elizabeth Craft Designs leaf die set which has three different sizes in the set - it's a go to leaf die for me. The tag is a Fiskars punch with a little flag accent created using an EK Success punch.The sentiment stamp is from Petit Pairs Stampin Up. Lastly, the cardstocks are Bazzill and the printed paper is Recollections. If you would like to give tea bag folding a try or are looking for more ideas I encourage you to take a look at my book Tea Bag Folding Through the Seasons which is currently on sale at Annie's or my online class or DVD Fabulous Paper Folds. Hope you are inspired to create something today!
Creatively Yours,
Sharon

Wednesday, October 16, 2013

Any Occasion Card!

Project design ©Sharon M. Reinhart
Thought I would share this delicate any occasion card before I start posting for Halloween and Christmas. This card makes use of a handmade embellishment made with Crayola Model Magic and a Mod Podge mold by Plaid. I have been having fun using this material in a variety of molds such as Martha Stewart, Mod Podge and even Wilton cake decorating molds. You can see some of my little creations below the card project. I simply used white but this material does come in a variety of colors or just color the embellishment afterwards with paints or inks.
This card consists of simple layers of cardstock and the printed paper is from Kaisercraft. A Stampin Up embossing folder was used on the card base, small punched border piece at the right side, which I believe is a Fiskars border punch, sheer ribbon, a die-cut leaf from Elizabeth Craft Designs and a couple rhinestone accents and that is it. The rose embellishment on this card was  colored with Brilliance ink. Hope you like it!
Creatively Yours,
Sharon

Saturday, October 5, 2013

World Card Making Day!

Project design by Sharon M. Reinhart 2013
Well I hope it's a wonderful day for each of you, full of inspiration and creativity! In honor of this special day I thought I would share this elegant but simple card and the instructions with you. What makes this card so simple is that it makes use of both sides of this beautiful printed paper from Kaisercraft -- Rapture. One side has these great 3 x 3-7/8 inch panels and the other is a beautiful floral print. I chose the Cherish panel for this card. Below are the instructions.
1. Form 4-1/4 x 5-1/2 inch side fold card from Bazzill cardstock.
2. Layer 4 x 5-1/4 inch panel of floral print cardstock.
3. Die-cut ivory pearl cardstock using Spellbinders Fleur de Lis rectangles die template (4 x 4-3/4 inch). Layer to card front.
4. Trim out Cherish panel and layer onto green cardstock leaving a slight margin. Layer this panel to card front using foam mounting squares.
5. Color heart rhinestone and four small rhinestones using Bic Mark-It pen (Tranquil Teal).
6. Adhere small rhinestones to four corners on die-cut panel.
7. Die-cut ivory heart using Stampin' Up Embosslits hearts die, adhere to top of Cherish panel followed by heart rhinestone.
8. Punch three hearts from green cardstock using Fiskars hand punch, adhere hearts to bottom of Cherish panel. *
9. Tie cream sheer ribbon in a bow and adhere to center bottom of panel on card front.
10. Decorate card inside as desired.
* Tip - apply 1/2-inch score tape to piece of green cardstock then punch hearts. Use a straight pin to assist in the removal of the tape liner and then with the straight pin still attached to the punched heart use the pin as a tool to place the heart on project. I like to keep a corsage style pin on hand for this.
That's it! Hope you enjoy it and are inspired to create!
Creatively Yours,
Sharon

Friday, October 4, 2013

Classes to be rescheduled

 
There seems to be a lot going on for people right now so I have chosen to cancel my mini card and canvas classes scheduled for October 5th and I will look at rescheduling at a future date. My apologies for any inconvenience. If you are interested in taking either of these classes at a future date just leave me a message.
Creatively Yours,
Sharon

Wednesday, October 2, 2013

Mini Card & Mixed Media Canvas Classes!

You are invited to join us for a crop at WOODCLIFF UNITED CHURCH 5010 Spruce Drive SW on October 5th. Register for the crop, the classes below or both the crop and classes!

project design by Sharon M. Reinhart

Join me on this creative adventure! Many of the techniques being used in creating this canvas also work wonderfully for card making and scrapbooking—using embossing folders, embossing on metal, stamping, etc. A variety of items and mediums will be used to create this project on an 8 x 10 canvas (not a square one as shown). Some of the items used in the creation of this project are; stamps, acrylic paints, bottle caps, wire, metal duct tape, and die-cut flowers. CLASS PARTICIPANTS need to bring scissors to be used on metal, craft knife and self healing mat, foam pad or mouse pad, embossing stylus with large and small tip, foam mounting tape or dimensionals, double-sided liner tape such as Scor-Tape (Sookwang) or red liner tape, pierc-ing tool & foam mat. We have blocked two hours for this class from 10:30 am to 12:30 pm. The canvas class fee is $30.00 per participant.
project design by Sharon M. Reinhart
I will also be teaching a MINI CARD CLASS from 1:15 to 2:15 pm consisting of the two cards shown below. The rosette card is a card & gift! The rosette is removable, doubling as a decorative magnet or hanging ornament. The fee for the card class is $13.00 per participant. Please bring your basic paper crafting kit with scis-sors, double-sided tape such as Scor-Tape, runner tape, foam mounting tape or dimensionals, paper trim-mer, bone folder.
Please register for these classes in advance directly through myself by email sharonmreinhart@yahoo.ca  no later than Oct 3rd, 2013. On site class registration will depend on availability.
Register for the crop directly with Joanne by email jliddymct@shaw.ca  $40.00
Hope to see you!
Creatively Yours,
Sharon

Tuesday, October 1, 2013

Layered Birthday Card!

Project design © Sharon M. Reinhart 2013
This card was created to celebrate my daughter's birthday and I thought I would share it with you -- she hasn't received it yet so hopefully she won't see it until she gets it. I want her to have a fabulous birthday! The inspiration came actually a couple of days ago when I was attending the Scrapbook Carnival that Canadian Scrapbooker Magazine hosts. It was wonderful to see so many familiar faces! There was tons of inspiration and excitement at this event! I was inspired by Emma Lou from Heartfelt Creations and the beautiful flowers that can be created with their stamps and coordinating die-templates. This card makes use of the Striped Sun Kissed Fleur stamp. The printed paper is Simple Stories, 24/SEVEN Bingo Cards/Stripe. I allowed myself to play a little bit in the making of this, bringing in a punched border strip, glitter on the word fabulous, brad and center star. A few pen strokes were added to the punched hearts, leaf and around the bingo card. I hope you like it and that you have a FABULOUS day, week, month, year, etc.
card inside
Creatively Yours,
Sharon

Monday, September 23, 2013

Spackle on Cards!

I had a great time teaching a wonderful group of ladies on Saturday at a card workshop hosted by a dear friend --thanks Jennifer! Two of the cards were Christmas theme and the third was this card created with, drum roll, spackle for walls and drywall tape. So hit the hardware store for some of these supplies. The other supplies used were a beautiful leaf stencil by Dyan Reaveley,the Daisy Flower topper die from Spellbinders Paper Arts, leaf set die by Elizabeth Craft Designs, green acrylic craft paint and a stamp from the Michaels bins. This flower was inspired by Becca Feeken's Anemone frilly flower on her Amazing Paper Grace blog, she is quite the talented lady!! Thanks for the inspiration Becca!! The difference here is that I used the Daisy topper and cut off the inner petal of the die-cut piece leaving the center in tact and layered them slightly offset. Then the petals were curled and accented with acrylic paint. For the leaf and the flower center simply apply drywall tape to cardstock then either punch or die-cut. Hope you like it!
Creatively Yours,
Sharon

Sunday, September 22, 2013

Spellbinders at the Emmys!!

Just wanted to put a shout out to the Spellbinders Paper Arts team - they will be at the Emmy Awards Connected Gift Lounge with the Craft and Hobby Association on September 22nd! Way to go!! I am so happy for your accomplishments! I encourage you to visit Spellbinders blog for info on a party and prizes using this link Spellbinders. Love their products and use them all the time, the card below as seen in my most recent CardMaker online newsletter was created using one of their cut, fold, tuck, Shapeabilitie dies. Cheers to all of you at Spellbinders -- Enjoy, you deserve it!!
Card design by Sharon M. Reinhart
Creatively Yours,
Sharon

Monday, September 16, 2013

Cut & Fold Techniques!

Cards designed by Sharon M. Reinhart
Hello All! My most recent CardMaker newsletter was released today and I would love to invite you to take a look. This is a free resource, all you have to do is sign up at CardMaker Magazine and every three weeks a new issue will come directly to your inbox. Kimber McGray and myself are the editors, so one issue will be written by Kimber and the next one by yours truly. This one is all about cut and fold techniques, so head on over using this link CardMaker Magazine.
Hope you like it!
Creatively Yours,
Sharon

Monday, September 2, 2013

Butterfly Wishes Card!


Firstly, I just want to thank my reader's for hanging in there with me, I know my posts have been few and far between. I am trying to regain my inspiration through a very difficult time. Hang in there with me - it is coming I promise.
For today's post I would like to challenge you to pull out those bits and pieces leftover from previous projects and create a card using them. It's actually kind of fun and is a good little nudge if you are looking for inspiration.
This card is simple but sweet, the butterflies (leftover pieces) are created using a Stampin Up die, a few little gems, the cardstock had pre-embossed dots on it, so no work or supplies needed there. The printed cardstock was a small leftover piece, I think it was Basic Grey probably discontinued. But that doesn't matter as the challenge is for you to use YOUR scraps, using this design somewhat like you would use a card sketch. The decorative square (Spellbinders) was from a previous project and the dotted square was the leftover piece from cutting a frame. A little sentiment from the Stampin Up Petite Pairs set (love this set) along with olive pastel chalk ink and you are good to go! If you are looking for a Stampin Up representative drop me a line I have a friend who is an absolute gem that I would love to connect you with! Hope you are inspired to create today!
Creatively yours,
Sharon

Tuesday, August 13, 2013

Card Making Using Pastes!

as seen in the CardMaker Magazine newsletter

My apologies for being gone for so long.
A quick post today to invite you to my most recent CardMaker newsletter which is all about using pastes in card making. Pastes such as spackle, modelling paste, embossing paste etc. Head on over using this link http://www.cardmakermagazine.com/newsletters.php and while you are there be sure to sign up for this free resource which once you are signed up it will be delivered directly to your inbox.
Creatively Yours,
Sharon

Tuesday, July 2, 2013

Making Cards with Party Napkins!

Project designs by Sharon M. Reinhart as seen in CardMaker's Newsletter
I would like to invite you to head over to CardMaker Magazine to enjoy this free newsletter about using paper party napkins to create cards with. I am co-editor of the newsletter along with Kimber McGray. We switch off writing the different issues and this is my latest edition. While you are there be sure to sign up for this free resource and the next issue by Kimber, coming out on July 15th will be  delivered right to your inbox. I hope you will head over and check out my latest edition using this link to CardMaker's online newsletter. Hope you like it and are inspired to create!

Monday, June 24, 2013

Thinking of You!

My post today firstly goes out to the people of Calgary and Southern Alberta who have been impacted by the recent unprecedented floods. I have been one of the fortunate ones, yes everyone has been impacted in some way whether it be business, jobs, personal, friends or family that have sustained loss. I say I am fortunate as my home is in an area that if you did not watch the news you wouldn't have known the devastation that was occurring in other areas. I am also fortunate with respect to my family who were also spared. So we do count our blessings today. My thoughts and prayers go out to the thousands who were less fortunate and those families who have also lost loved ones. You have been through a great deal and I know the days to come in the restoration process will be stressful and laborious. On a positive note I would like to extend my appreciation to everyone who has been and will continue to work endlessly for the benefit of the citizens of Calgary and Southern Alberta. Bravo!!
I chose to share this Thinking of You card today as a way of letting the people of Calgary know that "yes, we are thinking of you now and in the days to come as your lives and this city is restored!"

This card has been created using a new line of rubber stamps designed by my friend and fellow designer Ann Butler and manufactured by Unity Stamps. These wonderful gems are collections of one inch and two inch stamps. They are referenced as faux quilting stamps, but as you can see they are great for a variety of techniques, especially tea bag folding. I used a one inch square stamp from the Doily Picnic set along with Chestnut Roan fluid chalk ink for the tea bag fold medallion shown on the left side. Then I used the triangle (half square) for the horizontal decorative strip. Can't wait to get my hands on the two inch stamps as well! Congratulations Ann!
Creatively Yours, Sharon.

Saturday, June 8, 2013

Dad's Day Card!

Project Design ©Sharon M. Reinhart

With Father's Day only a week a way I thought I would share this fun and simple Dad's Day Card! When creating cards and often when creating masculine cards, I love to make use of drywall tape to create a textured background. It is one of my favorite products for crafting. Not only is it great to create a mesh look but it is also wonderful used as a stencil in mixed media cards and canvases. The drywall tape is the first layer on this card. Another favorite is smashed bottle caps. I usually purchase the caps at my local grocery store and then I flatten them in my old (lever push style) Sizzix machine, it works perfectly! I have used a Big Shot machine with the Stampin Up bottle caps and it worked great with those. I have not tried the real bottle caps in my Big Shot machine though.
Next, add some layers inside the bottle caps with a punched cardstock circle and stamped letters. Then layer onto a notched strip of cardstock on the card front. To create the notch or tail effect use a die template, square punch or simply a pair of scissors. If I am using scissors I have the most success by cutting a center line about one inch long and then cut from each corner to the center cut, works great. The printed paper is not current but I am sure there are many papers that would work wonderfully with this design. Hope you like it!
Creatively Yours,
Sharon

Monday, June 3, 2013

Happy Birthday Card!


Project Design Sharon M. Reinhart
Do you ever find yourself in need of a card but your inspiration is on a bit of a break? What do you do? My suggestion is to look at past creations and switch them up a bit. Even if it is a different theme than what you are in need of, it is possible to be inspired by the design. Another option is to use a card that may have been designed initially for a different occasion but will also work wonderfully with just a simple addition. This card is a perfect example, it was originally created with Valentine's in mind however with the addition of the Happy Birthday sentiment it conveys not only my love for the individual but also my wishes for a Happy Birthday. I might just use this one for my wonderful hubby's birthday! The theme on this card was originally based around circles and love, with the circles on the printed paper, the pressure embossed circles and even the circles on the XO stamped image - it was kind of fun to choose a theme like that and then run with it. See, themes can even be simple shapes. Next time you are stuck for an idea or inspiration I hope you give it a try!
Creatively Yours,
Sharon


Tuesday, May 28, 2013

Paper Folding Class!

 
I have some exciting news to share with you today! My Fabulous Paper Folds class is now available on DVD. So if you have been waiting to take this class but you were possibly looking for a different delivery method -- here it is! We take you through the different folding techniques and then you also have instructions for 16 projects that can be created using many of the folds learned. Just click on the photo below for more information and a free preview about this exciting class DVD.

I hope you create something wonderful today!
Creatively Yours,
Sharon

Thursday, May 23, 2013

Quick & Easy Card!


Project Design ©Sharon M. Reinhart
I thought I would share this quick and easy card with you today. It was actually created for some friends who have just become Grandparents. How exciting! Keep in mind that just because something is quick and easy does not mean it is not effective or themed to the recipient. This card is a congratulatory card for the safe arrival of our friends first grandchild - yes, a grandson, you guessed it. The materials used here were; a checkerboard embossing folder (believe Cuttlebug) a quilted heart Jesse James button, sheer brown ribbon, printed and solid cardstocks, Memories midnight blue ink and Colorbox Fluid Chalk ink by Clearsnap in Chestnut Roan color, stamp (Michael's bins) and some adhesive metal embellishments.
The inspiration began with the button which has a quilted effect on it. The button was not quite the right color so I applied some midnight blue ink to it and tied on a bit of sheer brown ribbon. The quilt or checkerboard effect was continued with the pressure embossed checkerboard on the vertical solid panel and that same shape was also repeated with the three square metallic embellishments.
Now if you are not in the market for a congratulatory card for a Grandson, switch up the colors for a Granddaughter or possibly a wedding or even a graduation card -- a heart embellishment works well for any of these special moments.
Creatively Yours,
Sharon

Sunday, May 12, 2013

Happy Mother's Day!

Hope all of you are enjoying this special day!
Just wanted to relay that I spent the day yesterday teaching some wonderful ladies. We were on a mixed media adventure creating a canvas and in the afternoon it was a card class working with iris folding, spirelli thread wraps and handmade flowers using the yellow pages!
Project Design ©Sharon M. Reinhart
I had a great time sharing and I hope at the end of the day each was inspired to create!
If you are looking for further card inspiration please check out CardMaker magazines online newsletter. It is a free resource that once you sign up the newsletter will go directly to your inbox. Kimber McGray and myself are the editors of this newsletter. Presently Kimber's Card Challenge Corner issue is up and my next issue goes live on Monday May 13th, so head on over and sign up. Here is a sneak peek -- It's Graduation Time!

Project Design ©Sharon M. Reinhart

If you are not in the market for graduation cards at this time I encourage you to use the designs in this newsletter somewhat like you would a card sketch. Take the basic design and switch up the theme and papers to coordinate with a different occasion. Congratulatory cards can be used for many occasions! Hope you are inspired to create!
Creatively Yours,
Sharon

Sunday, April 28, 2013

Mixed Media Canvas Class

Project design ©Sharon M. Reinhart
Many of you have asked when I was going to teach this canvas class again as you were not able to get in on the it the first time -- well Saturday May 11, 2013 is the date. I will be teaching this class at a paper crafting and scrapbooking crop hosted by Joanne Liddy-McTavish at the Woodcliff United Church 5010 Spruce Drive S.W. Calgary.
This whimsical canvas would make a wonderful gift for yourself or someone special in your life. I would like to give a shout out to Quietfire Design - the wonderful checkerboard image seen in this canvas is a rubber stamp from this great company! Please join me and embark on a mixed media adventure! Many of the techniques being used, also work wonderfully for card making and scrapbooking. A variety of items and mediums will be used to create this 8 x 10 canvas. Some of the items used in the creation of this project are; stamps, acrylic paints, bottle caps, wire, drywall tape, die-cut flowers and shapes, permanent marker, and a variety of found objects.
Class participants need to bring a brush suitable for use with mod podge or gel medium (not your best paint brush, even a foam brush will work), foam mounting tape or dimensionals, piercing tool & foam mat, fine point permanent black marker like a Sharpie, and double-sided liner tape such as Scor-Tape.
We have blocked two hours for this class from 10:30 am to 12:30 pm. The canvas class fee is $30.00 per participant. Please register in advance directly through Sharon by email sharonmreinhart@yahoo.ca no later than May 9th, 2013. On site class registration will depend on availability. Keep watching, samples of the mini card class with Sharon still to come!  Register for the class OR the crop OR both! Register for the crop directly with Joanne by email jliddymct@shaw.ca. Looking forward to sharing this creative adventure with you!
Creatively Yours,
Sharon

Saturday, April 20, 2013

Card for Mom!

project design ©Sharon M. Reinhart 2013
With Mother's Day approaching, I thought I would share this simple but delightful creation with you. This card is created using printed papers from Michael's and a pearl text weight paper by I believe Stardream or Curious Metallics. The flower is created with two separate tea-bag folded medallions that were created using the basic circle fold and one progression (one of my favorite folds) then layered together with a brad accented with an adhesive rhinestone. The next layer is created using a beautiful Memory Box die called Tilth Floral - one layer was cut from the purple print paper and another from the pearlized text weight paper. The leaves are created using a die from Elizabeth Craft Designs and card stock. Stamp the letters for MOM on the pearl paper, punch out and adhere in the top right corner and you are done. If you want to learn all about tea-bag folding, iris folding and some fun folds be sure to check out my online class Fabulous Paper Folds or possibly one of my books. Hope you like this card! I think this one will be going to my own Mom.
Creatively Yours,
Sharon

Wednesday, April 17, 2013

Cousin Slide Bracelet Reveal!

In my last post, I spoke of waiting for a special package to arrive, well it did! I was one of a group of designers who were asked to review this new product - the Slide Bracelet. I have dabbled in jewelry making a little bit, but I am far from a professional jewelry maker. Thus this task of reviewing this new product line from Cousin had me curious, it was referred to us that "one did not have to be a jewelry maker in order to create a slide bracelet". Well, I must say it is totally true! I truly enjoyed putting my bracelet together and I will wear it with pride!
I chose to combine elements from two different sets. I do like having the ability to customize the bracelet.


As there is a rhinestone in the center of the flower, I chose to add a small rhinestone to the center of the outside metal slides, just to add a bit more bling. I think it turned out quite nicely! 
 
I encourage you to view this video for a great tutorial on how to put these bracelets together. Thanks to Liz and the Cousin company - I enjoyed working with this product and feel that I achieved success without any frustration at all!
Creatively Yours,
Sharon

Friday, April 12, 2013

Cousin Slide Bracelets

Besides paper crafting I am an avid crafter/mixed media designer who enjoys working with a variety of materials. I shall be receiving a special package from the Cousin company shortly, in order to create one of these beautiful slide bracelets. In the meantime I thought I would give you a peek at this product. I have seen some great designs created by other designers, such as my dear friends Eileen Hull and Lorine Mason, using these materials. I am so looking forward to creating one myself. The company has many wonderful products and I encourage you to visit their site here. The step by step photos below show how simple of a process it is to put one of these beautiful bracelets together.
Be sure to watch for a future post where I will share my creation!
Creatively Yours,
Sharon

Tuesday, April 2, 2013

Creating Cards With Fabric

Project design ©Sharon M. Reinhart 2013
I wanted to invite you to visit my most recent newsletter at CardMaker Magazine, it is a free resource that once you sign up will be delivered directly to your inbox.This issue is all about using fabric to create cards with, even if you don't sew! As you can see from the photo above, a variety of techniques are discussed. Kimber McGray is also an editor of the newsletter and we alternate the writing of the issues. Head on over by using this link -- CardMaker newsletter. I truly hope this issue inspires you to create!
Creatively Yours,
Sharon

Wednesday, March 27, 2013

Easter Decor


Thought I would share this little basket that could be used for a little treat! This basket brings recycling into play as the base is a yogurt container and some of the flowers have been created using the yellow pages. Clean and dry the container then wrap it with some pretty cardstock. The embellishment on this creation was made with punched leaves using a Martha Stewart punch, handmade flowers -- two of which were created with phone book pages and a Spellbinder's scalloped circle die. The third flower is creating by starting with a punched circle, then cut a spiral into the circle and coil into a pretty little flower. All of the flowers have light accents of gold metallic paint. The handle on the basket is two chenille stems twisted together along with some wire trim. Add some crinkled paper or basket filler and your treats!  I can't take credit for the yummy treats inside, you will have to visit the candy store for those, or put a real colored egg in.
I thought this little basket would be a pretty little addition to the dinner table or just for a sweet little favor for guests. This idea could be used for many occasions such as Mother's Day brunch, baby and/or wedding showers too! Great little project for kids as well, depending on the age, some assistance may be needed for the flowers or switch it up a bit and use punched or die-cut flowers, even silk flowers would be pretty.
Hope you like it!
Creatively Yours,
Sharon

Wednesday, March 20, 2013

Spring Greetings!

Project Design ©Sharon M. Reinhart 2013
As this is officially the first day of Spring I thought it only fitting to share a spring theme card. Can you tell this is one of my favorite tea-bag folds? This one begins with the basic circle fold and then one progression, quite simple. If you would like a class on tea-bag folding, iris folding and some fun folds I encourage you to check the free preview of my Fabulous Paper Folds online class at Annies! Not only do you learn all the folds and tons of progressions in the video, but there are also 16 card projects with complete step-by-step instructions that may be downloaded.
Back to this card. I purposely left off any sentiment as I felt this particular card would be perfect for a variety of occasions such as Easter, Mother's Day, Baby, Just Because and Happy Birthday! It is a quick one to put together. The embossed polka dot panel was created using a Darice embossing folder. The printed paper is from Doodlebug design (I don't believe it is current though), look in your stash of papers, as I did, and use a bright print that you already have. The pink card base is Bazzill Bling and the dies -- Floral Doily Accent and Pennants are from Spellbinder's TM. The large pearl brad in the center of the tea-bag fold medallion is from the Bridal section at Michael's and the three small pearls are from Kaisercraft. Hope this card helps to put a little "Spring" in your step even if the weather in your area may not look very spring like!
Creatively Yours,
Sharon

Friday, March 8, 2013

Card Class!

Just wanted to invite you to a book launch and mini card class on Saturday March 16th, the class is from 10:30 am to 11:30 am, create two any occasion cards using iris folding and tea bag folding techniques. The card class fee is $10.00 per person, payable by cash or cheque to myself. Participants please bring scissors, paper trimmer, bone folder, double-sided tape & dimensionals/3D foam tape. To ensure you have a spot in the card class, please register directly with me by Friday March 15th,at sharonmreinhart@yahoo.ca , registration at the crop will be subject to availability. Copies of my new book Iris Folding for Life’s Special Moments will be available for purchase between 10:30 am to noon. The price for the book is $12.00 payable by cash or cheque.
Participants may register for either the crop, card class OR both events. Contact Joanne to register for the crop and Sharon for the card class.
Location:
WOODCLIFF UNITED CHURCH
5010 Spruce Drive SW
Crop Fee $40.00
Contact Joanne to register for the crop at
jliddymct@shaw.ca
Hope to see you there!
Sharon 

Monday, March 4, 2013

New Arrival!


No its not a baby! It's my new book Iris Folding for Life's Special Moments! I finally have the hard copy in my hands. I am quite thrilled and must say that everyone that worked on this book from editing to photography and everything else it takes to put a book together, did a marvelous job! Heartfelt thanks to all! 

Project Design
 ©Sharon M. Reinhart 2013
In honor of this newest release, I have created an iris fold card especially for you, my blog readers! This card is created using cut strips of card stock to completed the iris fold. This one is a  monochromatic look and I think it turned out quite nicely! If you are interested in learning more about iris folding I encourage you to check into this new publication Iris Folding for Life's Special Moments.
I am scheduled to do a book signing and mini class in southwest Calgary on March 16, 2013 at a Scrapbooking Crop being organised by Joanne Liddy-McTavish. Save the date! More info to come.
Creatively Yours,
Sharon

Wednesday, February 20, 2013

Challenge Yourself!

Project design ©Sharon M. Reinhart
printed papers from Susan K. Weckesser
Hi All!  Thought I would share this creation with you. My challenge was to work with colors that are not my norm. I was inspired by Susan Weckesser's printed papers. I have always enjoyed creating backgrounds and recently have been using more acrylic paints in my card backgrounds. However, as time goes or the lack of time, sometimes I want to create the look of a mixed media background but either don't have one ready or that block of time to create it is not available. That's how these papers inspired me, they resembled some of the paint or ink layering techniques that I enjoy doing.  I encourage you to visit Susan's website using this link. Besides wonderful papers, she also has rubber stamps and stencils. While you are there check out her blog!
Back to this card, it is quite simple and involves creating a teabag folded medallion using the circle fold and pearl text weight paper. The other papers are all from  Susan K. Weckesser and four of her lines; Live in Color Tags, Color Burst, Live in Color and Live, Love, Create, even the sentiment, which is printed on the edge of the paper and the name of one of the lines. It worked perfectly, trim the words out, edge with some Distress frayed burlap ink, cut or punch a notch and add a rhinestone accent. I used one of her stamps to create the look of a flower stem coming from the teabag folded medallion. The leaves are punched using a Martha Stewart punch. A little pencil smudging around the birdie and some Tombow and Spica markers on the butterfly and voila! I was pleased with the results.  Hope you are too!
Creatively Yours,
Sharon