Friday, August 26, 2011

Artist Trading Cards

Design ©Sharon M. Reinhart 2011
In case you have not been introduced to Artist Trading Cards, in brief form, they are 2 1/2" x 3 1/2" miniature pieces of art work that can be created using almost any medium and are traded and never sold. I thought I would let you know that my most recent newsletter, the August 22, 2011 issue, is all about Artist Trading Cards so for further information and inspiration head on over to CardMaker Magazine's online newsletter by clicking on the link. Here is a sneak peak! Enjoy!
Creatively yours,
Sharon

Monday, August 22, 2011

Tea Bag Fold Card

Design ©Sharon M. Reinhart 2011
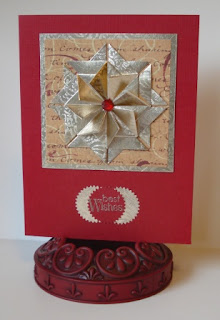
It seems that many people enjoy the simple but elegant style of card. I have chosen to share this card because it truly is simple.  People assume that tea bag folding is difficult and truly it is not.  Once you have the basic folds and do a couple practice folds you are good to go. This card incorporates a basic triangle fold with an extra fold to create the square shape that becomes the dimensional piece. If you don't have a clue about tea bag folding and you would like to learn more please check out my book Tea Bag Folding Through the Seasons by clicking on the cover shot above right, it has step by step instructions, outlines the basic folds and there are lots of diagrams. Of course if you have a question you can always leave me a comment here. 
This card was finished by layering the folded medallion onto printed script style paper and then a layer of the gold paper. The greeting is a Stampin' Up greeting and then simply punched out.  This is a card that could be used for multiple reasons and seasons, perhaps even a Christmas greeting. Watch for Christmas inspiration coming soon! Hope you like the simplicity of this card. 
Creatively yours,
Sharon

Monday, August 15, 2011

From Card to Home Decor!

Design ©Sharon M. Reinhart 2011
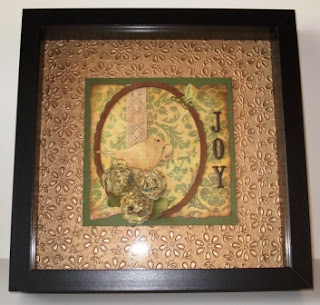
Two areas of paper crafting that I really enjoy are cardmaking and home decor projects. Well for this project I made use of a card that I had created for a recent CardMaker newsletter article -- From Trash to Treasured Cards, not only were the flowers created using an old phone book, Spellbinders scallop dies and inks, but now I have also repurposed the card into a home decor piece. I layered the card onto beautiful embossed daisy paper and then placed the project into an Ikea frame. So, go take a look at your collection of cards, maybe some of them would make a perfect home decor piece. Time and time again I look at wall decor pieces in the store and say "I can make that" and I never take the time out to do it, so this was a step in the right direction. There is hope for me yet!  Enjoy!
Creatively yours,
Sharon
Blog Hop Button Finished on the 15th: FaveCrafts Blog Hop for August

Saturday, August 13, 2011

Stamped card with Background Technique

Card Design © Sharon M. Reinhart
Hi All! Well I am working with my stamps and inks again and I love this background technique it is super simple. All you need is an acrylic block, the type used with cling and/or clear stamps, distress inks, mister with water and white cardstock. Apply the distress inks direct to the clear block from the ink pad. Dab and swoosh the inks (technical terms of course). Apply inks from lightest to darkest in order to minimize color contamination of your ink pads. The colors used on this card are peeled paint, faded jeans and vintage photo. Spritz the ink with water, then press it onto white cardstock. This technique works wonderfully on watercolor paper as well! A quick and easy water-color or direct to paper background! The stamp image is from Crafty Individuals (Magenta). For the flowers, I learned this trick from a friend, thanks Nancy for sharing! Purchase the flowers from the wedding section from Michaels and then to custom color simply use your Bic Mark It pens, Tombows or Copics, or even inks and sprays, it's as easy as that. The Bic Mark It pens were used in this card. Hope you enjoy this creation!
Creatively yours,
Sharon

Monday, August 8, 2011

Happy Birthday Card


Design ©Sharon M. Reinhart 2011
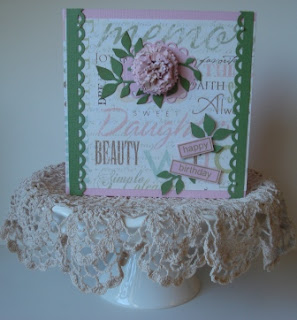
Happy Birthday to all of you born on 8/8 and those born on 8/8/88 like my youngest daughter for whom this card was created. Yes, back to handmade flowers, (cannot get enough of them) however using a different die. This time I used the pinked circles die from Spellbinder's, it worked beautifully, creating a carnation style flower. The leaves are from ProvoCraft - love them, I think this one had three different dies in the set. The border was created with a Fiskars border punch.
Quick post today - some simple inspiration!
Enjoy!
Creatively yours,
Sharon

Thursday, August 4, 2011

Elegant Wedding Congrats Card!


It is that time of year where many of us find ourselves in need of wedding or shower cards. I have chosen to share this one as it is quick and easy and utilizes an inexpensive object found at a dollar store. Which object do you think that is? You may have guessed it, the wire heart. But do you know what its intended purpose is? It along with its partner used to be earrings. Yes, I could have wire wrapped my own piece and usually do make alot of my embellishments by hand, but this time it really was more feasible to use this embellishment. Just remove the earring wire and insert a crystal brad. Of course the beautiful papers in this card also add to the elegance. The base card is charcoal shimmer card stock. The congrats was die cut and adhered to the card then the card front was embossed using an embossing folder. Beautiful printed chiyogami papers from the Japanese Paper Place were used on a square of coaster board for added dimension, then the embellishment was layered on top. To finish the design the panel was then layered onto a die cut label from Spellbinder's. I love the color pallette in this card and the Chiyogami paper - so much so that I used this color combination and papers to create a tea bag folded design in my most recent book Tea Bag Folding Through The Seasons, just click on the photo at the top right for access to view some of the designs in this book. If you are in the Calgary area, Paper Pastimes carries a wide variety of beautiful Chiyogami papers that I am sure you will love!  Hope you like this card!
Creatively yours,
Sharon

Tuesday, August 2, 2011

Stamping Inspiration!

I was sorting through some things and came across this card from my past. I remember making this card for a class and I just loved how it turned out. When I first started making cards I started as a rubber stamping enthusiast, I still have a love for rubber stamping but for many other techniques and mediums as well. This particular card utilized vellum, chiyogami paper, pearl paper, threads and of course a rubber stamp. The image was stamped on vellum with permanent ink (Memories Artprint Brown) and then stamped again on pearl card stock and heat embossed with gold. The color of the cardstock on the embossed image was removed in specific areas by painting bleach onto the surface. The image was trimmed around and adhered onto the scroll using foam mounting tape. Paper beads made with the same Chiyogami paper that is layered on the card, adorn the edges of a wooden skewer  at top left and right and another bead with threads at the center bottom. The reason I am sharing this card with you is that it was one of my favorites but also because some techniques and cards are timeless. It can also be a useful tool to revisit some of the techniques you have used in the past especially if you are in need of some inspiration. Hope this card inspires you to create!
Creatively yours,
Sharon